Wednesday, 3 October 2012

Rainbow Ripple Hooded Jacket

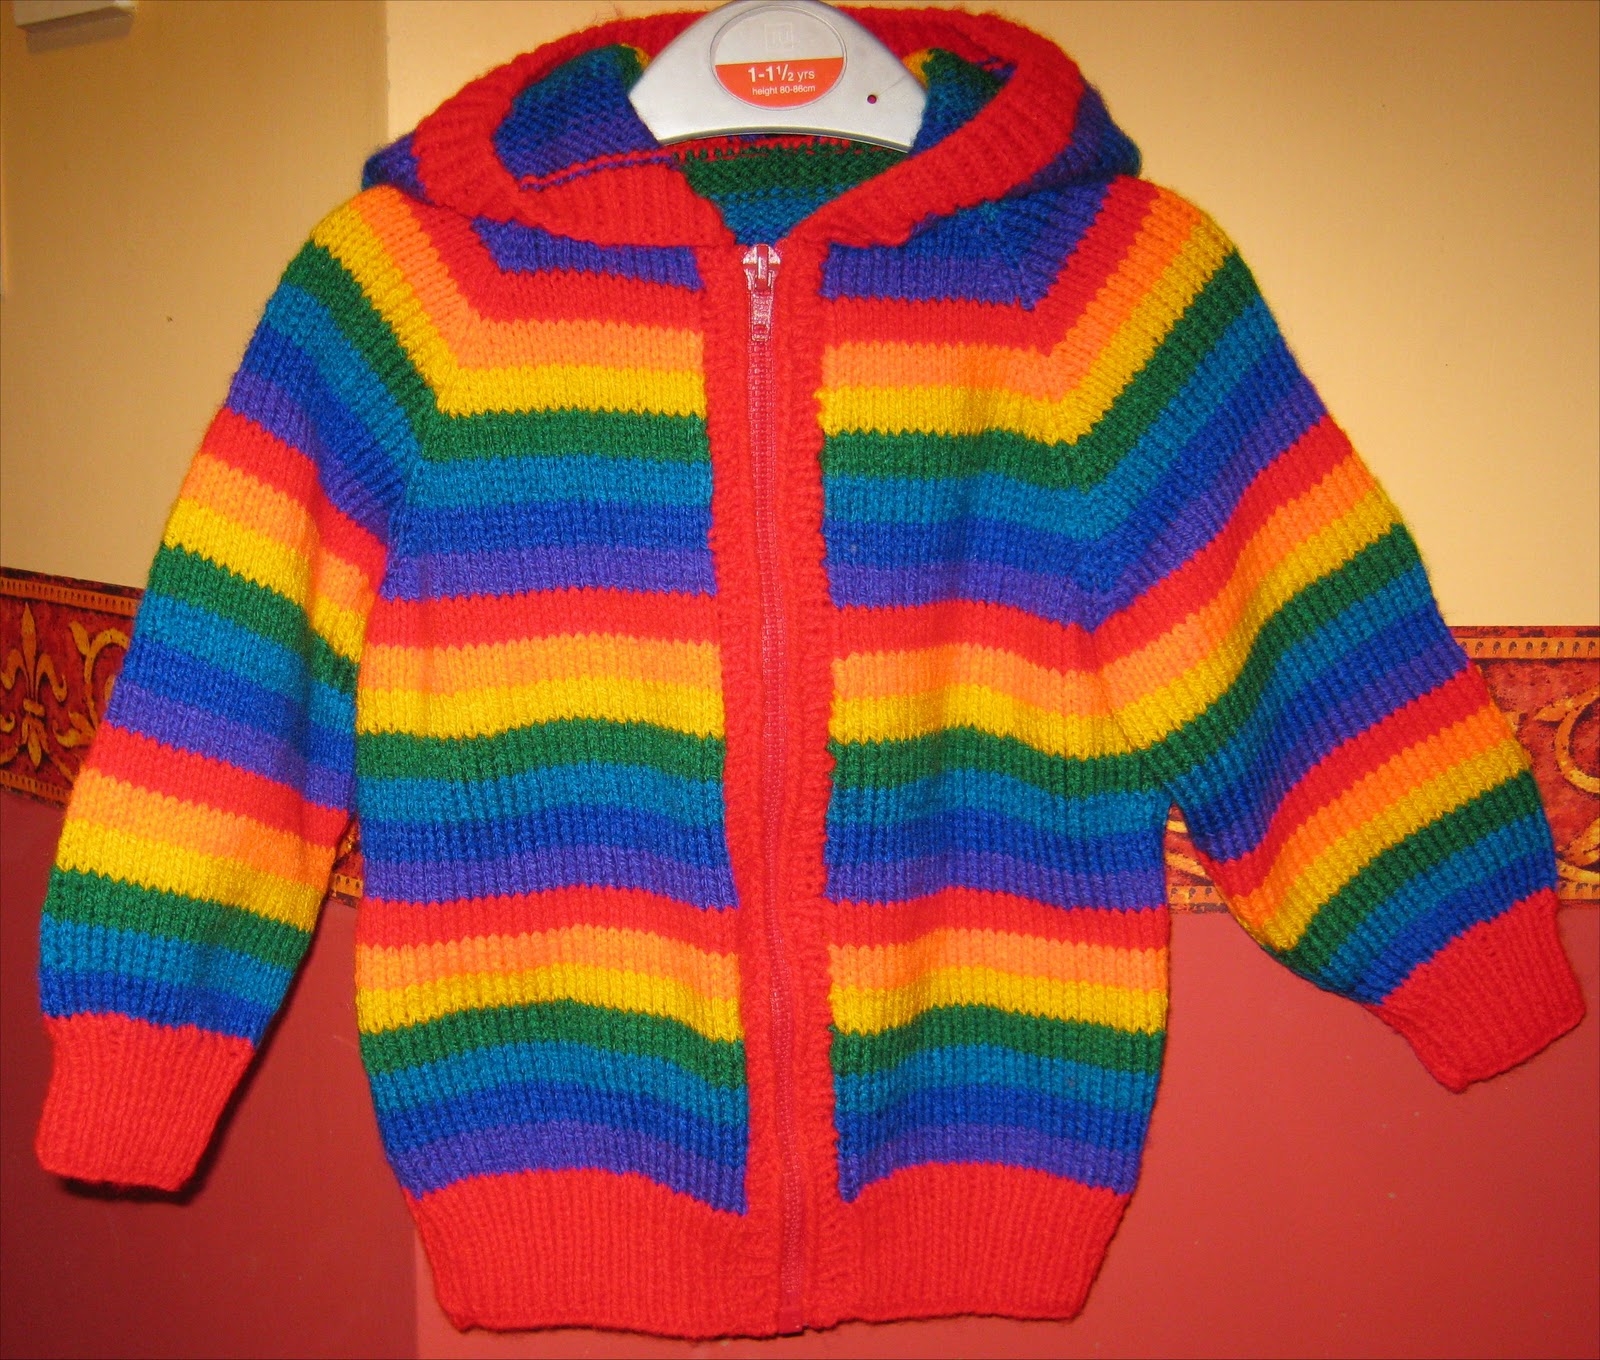
I've finally managed to design and knit something for myself - I haven't seen this stitch pattern anywhere else so I guess I must have invented it! I wanted a comfy hooded jacket for winter days at my husband's freezing cold shop, and used twelve colours plus black to make it. You could try using a single contrast colour, or two, three or four - it's a great way of using up odd balls of yarn from your stash. You might want to use more subtle contrast colours, especially if you make it for a man, but I love bright colours so I'm going to wear them all!
Rainbow Ripple Hooded Jacket - front (see below for back view)

Instructions


Materials:

Woolcraft New Fashion or Hayfield Budget DK (100% acrylic):
4 x 100g balls black (MC)
30g of each of 12 contrast colours
Note: If you choose to use only one contrast colour, you will need 4 x 100g balls; 6 contrast colours will require 60g of each and so on.
26 in open ended zip to match MC.
Pair 4 mm long knitting needles (at least 14 in/35 cm)
Pair 3.5 mm long knitting needles

Tension:

23 sts and 32 rows to 10 cm/4 in over pattern

Size:

To fit 40-42 in bust/chest – actual measurement 45 in
Length 27.5 in
Sleeve seam 17 in

Abbreviations:

K      knit
P      purl
M1    make 1 st by picking up loop between 2 sts and knitting into the back of it
st st        stocking stitch
g st        garter stitch (every row K)
patt        pattern
tog        together
st(s)        stitch(es)
inc        increase
dec        decrease
RS     right side
WS        wrong side
MC    main colour
in        inch(es)

Back:

Using MC and 3.5 mm needles, cast on 130 sts and knit 5 rows.
Change to 4 mm needles and join in first contrast – do not cut MC yarn, just carry it up the side of your work, taking care not to pull it too tightly. Work as follows:
Pattern row (RS): K2tog twice, (K1, M1) 4 times, K1, K2tog twice. Repeat to end of row (13 st repeat)
Work 3 rows st st, starting with a purl row.
Using MC, work pattern row again, then knit 3 rows.
Continue in this manner, working 4 rows contrast in st st, then 4 rows MC in g st, the first row in each colour being the pattern row, until work measures 17 in.
Decrease for raglan:
Note: take care to keep continuity of pattern: use markers to indicate end of pattern repeat as needed)
Cast off 1 st at start of next 2 rows, work 2 rows straight.
Dec 1 st at each end of next and following alternate (RS) rows until 40 sts remain. Cast off.

Pocket linings: (make 2)

Using MC and 3.5 mm needles, cast on 27 sts and work in st st for 5½ in. Leave sts on a spare needle.

Left front:

Using MC and 3.5 mm needles, cast on 65 sts. Knit 5 rows.
Change to 4 mm needles and pattern as for back until work measures 7 in, ending with 4th pattern (contrast) row.
Insert pocket lining and form pocket opening:
Next row (RS): With MC, pattern 19 sts, place next 27 sts on a stitch holder, patt 27 sts from spare needle, patt remaining 19 sts (65 sts).
Continue in patt until front measures same as back to start of raglan decrease.
Decrease for raglan: (see note above)
Cast off 1 st at start of next row, work 3 rows straight.
Dec 1 st at start of next and alt (RS) rows until 29 sts remain, ending with a RS row.
Shape neck: Cast off 5 sts at start of next row. Dec 1 st at neck edge of next 5 rows, at the same time continuing to dec on alt RS rows at armhole edge, until 4 sts remain.
Next row: K2 tog twice
Next row: p2
Next row: K2tog and fasten off.

Right front:

Work as for left front, reversing all shapings.

Pocket tops: (2 alike)

Using 3.5 mm needles and MC, place 27 sts from stitch holder on needle with RS facing and k 4 rows. Cast off.

Sleeve: (make 2)

Using 3.5 mm needles and MC, cast on 65 sts and knit 5 rows.
Change to 4 mm needles and pattern as for back, increasing 1 st at each end of next (RS) row and every following 8th row until there are 91 sts. Take care to incorporate new stitches into pattern (see note above).
Work straight until work measures the same as the back to armhole shaping.
Note: if you need to adjust the length of the sleeves or the body, you must ensure that the pattern still matches up when you come to work the raglan shaping. For example, if you reduce the sleeve length by one pattern, start the sleeve pattern with the second contrast.

Decrease for raglan:  
Cast off 1 st at start of next 2 rows.
Work 2 rows straight, then dec 1 st at each end of the next row. Work 1 row straight.
Repeat last 4 rows twice more (83 sts).
Dec 1 st at each end of next and following alternate (RS) rows until 7 sts remain. Cast off.

Hood:

Using 3.5 mm needles and MC, cast on 169 sts. Knit 5 rows.
Change to 4 mm needles and pattern as for back until work measures 2½ in, ending with WS row.
Dec 1 st at each end of next and following alt rows until there are 143 sts.
Work straight until work measures 10½ in. Cast off.

Front borders:

For each side, using 3.5 mm needles and MC, pick up and knit 156 sts evenly along front edge. Knit 2 rows. Cast off loosely (use a size larger needle if necessary).

Making up:

Press pieces according to instructions on ball band (do not press 100% acrylic yarn).
Sew edges of pocket tops to front, and edges of pocket linings to inside of fronts.
Join raglan seams, matching coloured stripes carefully. Join side and sleeve seams. Insert zip. Attach hood to neck, easing in any fullness.
Press seams lightly under a dry cloth.

Back of jacket

Thursday, 6 September 2012

Toddler's Domino Hooded Jacket

After making several items in mitred square knitting for the home, I finally took the plunge to produce an actual garment using this technique! I had some variegated yarn in my stash, and came up with this jacket for my granddaughter. It's quite simple to knit, the squares get smaller as you progress up the main part. The only tricky parts are the half diamonds at the front and top edges; hopefully my instructions will be clear enough.

You can use any yarn that knits to the correct tension: I prefer to use 100% acrylic for kids' clothes, as it washes easily, dries quickly and doesn't itch. Don't iron or tumble dry it though, and wash it at 30 degress C, or it will go out of shape very quickly.
You could ring the changes by making the diamonds in rows of different solid colours, with a plain or striped yoke and sleeves. Be creative!


Toddler’s Domino Hooded Jacket


Materials: 

3 x 100g balls variegated/self striping DK yarn
Pair UK 9/3.75mm needles
3.5mm crochet/afghan hook (with point at other end)
5 buttons

Tension:

24 sts to 4 in (10 cm) on 3.75 mm needles over stocking stitch

Measurements:

To fit approximately 2 to 4 years
Chest 22 in (actual measurement 25 in)
Sleeve seam 10 in

Abbreviations:

K      knit
P       purl
M1    make 1 st by picking up loop between 2 sts and knitting into the back of it
st st   stocking stitch 
g st    garter stitch (every row knit)
tbl      through back of loops
tog     together
st(s)   stitch(es)
S1     slip one without knitting
psso   pass slipped stitch over
RS     right side
WS   wrong side 

Main part

First diamond row

With 3.75mm needles, cast on 36 sts.
Foundation row: K2tog, K to last 2 sts, K2tog.
** Next row (RS): K to centre 4 sts, K2tog, S1, K1, psso, K to end.
Next row (WS): K
Repeat these two rows until 4 sts remain.
Next row (RS): K2tog, S1, K1, psso
Next row: K2tog, cut yarn and pull through to fasten off.
Make 7 more diamonds like this.

Second diamond row

Using 3.5mm Afghan hook, pick up 17 sts along the top left edge of one black diamond, then 17 sts along the top right edge of another.
Transfer the 34 sts to a 3.75mm knitting needle from the pointed end of the hook.
Foundation row: K2tog tbl, K tbl to last 2 sts, K2tog tbl.
Continue as for first diamond from ** above.
Work a further 6 diamonds like this between the ones made for the first row.

Half diamond – left hand edge

Using Afghan hook, pick up 17 sts along top right edge of the second row diamond at the left hand edge (right side facing you). Transfer sts to 3.75 mm needle.
Foundation row: K2tog tbl, K to end.
Next row: K to last 2 sts, K2tog
Next row: K
Repeat last 2 rows till 2 sts remain. K2tog and fasten off.

Half diamond – right hand edge

Using Afghan hook, pick up 17 sts along top left edge of the second row diamond at the right hand edge (right side facing you). Transfer sts to 3.75 mm needle.
Foundation row: K tbl to last 2 sts, K2tog tbl
Next row: S1, K1, psso, K to end
Next row: K
Repeat last 2 rows till 2 sts remain. K2tog and fasten off.

Third and remaining diamond rows 

As for second row, but picking up 16 sts per side.
Continue in this manner, picking up one stitch fewer on each side for each row of diamonds until ypu have worked a row with 11 sts each side (7 rows of diamonds in all).

Top edge half diamonds

Work horizontal half diamonds between the last row as follows:
Pick up 10 sts each side as above. Work foundation row.
Next row: K to centre 4 sts, K2tog, S1, K1, psso, K to last st, turn (leaving 1 sts on other needle.)
Next row: K to last st, turn.
Continue in this manner, decreasing twice at the centre and leaving one more st on the needle at the end of each row until you have 12 sts left. Cut yarn and place these 12 sts on a large safety pin.
Repeat for the other 7 horizontal half diamonds.

The main part complete - note the half diamonds, and the safety pins holding the stitches!


Yoke

With RS facing, pick up and knit 1 st at start of row. Work across 12 sts on first safety pin as follows: **K5, M1, K2, M1, K5. Pick up and knit 4 sts from gap between diamonds. 
Repeat from **6 times more, then K5, M1, K2, M1, K5, and finally pick up and K 1 st at end of row (142 sts)
Work 9 rows garter st, then 2 rows st st, ending with a purl row.
Divide for front and back sections: K 31, cast off 6, K 68, cast off 6, K 31.

Left front

Next row (WS): P31, dec 1 sts at armhole edge of this and next 4 rows (26 sts)
Decrease on K rows only until 14 sts remain.
Cast off 4 sts at start of next neck edge row.
Dec 1 st at neck edge on next 3 rows, at the same time continue to dec 1 st at armhole edge on alternate rows, until 2 sts remain.
K2tog and fasten off.

Back

Rejoin yarn to next block of sts, P 68.
Dec 1 st at each end of next and following 4 rows (58 sts).
Dec 1 st at each end of knit rows only until24 sts remain. Cast off.

Right front

Rejoin yarn and P 38. Work right front to correspond with left front, reversing all shaping.


Sleeves (make 2)

Cast on 39 sts and work 1 inch in g st.
Inc row: K4, (inc in next st, K5) 5 times, inc in next st, K4 (45 sts). Working in st st, inc 1 st at each end of next and following 6th row until you have 59 sts. Continue straight until sleeve measures 10 in.
Raglan shaping: Continuing in st st, cast off 2 sts at beg of next 2 rows. Dec 1 st at both ends of next 5 rows, then dec 1 st at both ends of each RS row until 7 sts remain. Cast off.

Hood

Cast on 113 sts, K 8 rows.
Inc row (WS): K7, (M1, K11) 9 times, M1, K7 (123 sts).
St st 8 rows.
Dec 1 st at each end of next and every alternate row (RS rows) until 101 sts remain.
Work straight in st st until work measures 7 inches in all.
Cast off. Join back seam.

Button band

With RS facing, pick up and knit 85 sts evenly along left front edge. Work 9 rows garter st. Cast off loosely (note: it may help to use a size larger needle).

Buttonhole band

Pick up and knit 85 sts along right front edge as for button band. Work 4 rows garter st.
Next row (WS): K3, (cast off 3, K8) 4 times, cast off 3, K to end.
Next row (RS): K to first buttonhole, (turn, cast on 3, turn, K8) 4 times, turn, cast on 3, turn, K3.
Work 3 more rows garter st. Cast off loosely (see note above).

To make up

Weave in all ends. Join sleeve seams and underarm seams. Attach hood, matching shaped edges to front neck shaping and easing in fullness to neck. Neaten buttonholes by oversewing around them. Attach buttons. Press seams lightly under a dry cloth.


Wednesday, 5 September 2012

More mitred square knitting - two throws


I suddenly realised I hadn't posted anything since the end of May - I've been too busy knitting to write about it! So I'm making an effort to get some of my patterns committed to paper (or the Internet) before I lose my notes. Having got hooked (or needled) on mitred square kniting, I completed a couple of projects earlier this year - an Autumn Throw in rusty reds to go with my newly-decorated living room, and a Sunshine and Shadow diamond throw for the bedroom.

Mitred Square knitting - Autumn Throw

The throw is made up in sections which are then sewn together - this allows you to work from the outside edge inwards towards the centre, making an even border which looks good whichever way you throw it!
Jake and Harley seem to think I made the throw for them!

Instructions for Autumn Throw
Materials:
100% acrylic DK – 3 balls main colour (MC) – mine is Hayfield Bonus Classic Red
2 balls each of 5 contrast colours (you will only use a small amount from the second ball of each).

One pair 3.75mm knitting needles
3.75mm long crochet or afghan hook (with a hook at one end and a point at the other).


Measurements:
The finished throw measures approximately 48 x 44 inches – to make a larger or smaller throw, simply add or subtract rows of diamonds on the diagram. Small diamonds are about 3 in across the diagonal, large diamonds about 6 in.

Border diamond
Using 3.75mm needles and MC, cast on 26 sts.
Foundation row: K2tog, K to last 2 sts, K2tog.
** Next row (right side): K to centre 4 sts, K2tog, S1, K1, psso, K to and.
Next row (wrong side): K
Repeat these two rows until 4 sts remain.
Next row: K2tog, S1, K1, psso
Next row: K2tog, cut yarn and pull through to fasten off.

Make another diamond the same, then join them with a third as follows:
Using MC and 3.75mm Afghan hook, pick up 13 sts along the top left edge of one diamond, then 13 sts along the top right edge of another.
Transfer the 26 sts to a 3.75mm knitting needle from the pointed end of the hook.

Foundation row: K2tog tbl, K tbl to last 2 sts, K2tog tbl.
Continue as for first diamond from ** above.

Continue to make sets of three diamonds until you have enough for the borders (see diagram).

Make a group of 4 of these diamonds in MC for the centre section.

Main diamond – first row

Using 1st contrast (mine was Hayfield Bonus claret) and 3.75mm afghan hook, pick up 25 sts along the top left edge of a border diamond group, then 25 sts along the top right edge of another group.
Work foundation row as for border diamond.
Continue as for border diamond, working 8 rows in each colour.

Continue as per the diagram, picking up stitches from the previous row of diamonds and reversing the colour sequence on alternate rows as in the photo above.


Join the sections together using over sewing, to obtain a flat seam.  Weave in ends after finishing, sewing them into the seams and picked up stitches.

Unfortunately the diagram lost some lines when transferred from Publisher to PaintShop Pro - I really need a new computer!

Instructions for Sunshine and Shadow Throw


The design for this throw is based on a traditional Amish quilt design, which uses bands of black squares alternating with light and dark shades of other colours.  It is entirely made up of single plain-coloured squares, knitted in four sections and sewn together as per the diagram.  The single centre dark purple square can be knitted onto one of the four sections; it is shown separately here for clarity.


Materials:
To make the throw you will need DK yarn in 9 colours as follows:
3 x 100g balls Black (main colour)
2 x 100g balls in Dark green and Mid green
1 x 100g ball in Dark and Mid Purple, Dark and mid blue and Dark and mid red.
I used 100% acrylic yarns, mainly Hayfield Bonus and Woolcraft New Fashion.
You will also need 1 pair size 3.75mm knitting needles
3.75mm afghan hook (long crochet hook with a point at the other end – you can get a set of 14 different sizes in bamboo from Amazon.co.uk).

The squares are referred to as diamonds in the pattern as they are worked diagonally.

Measurements:
The throw is roughly 45 inches square - diamonds measure about 3 in across the diagonal.

First row of diamonds (outer edge):
Make 14 separate black diamonds as follows:

Using 3.75mm needles and black yarn, cast on 26 sts.
Foundation row: K2tog, K to last 2 sts, K2tog.
** Next row (right side): K to centre 4 sts, K2tog, S1, K1, psso, K to and.
Next row (wrong side): K
Repeat these two rows until 4 sts remain.
Next row(RS): K2tog, S1, K1, psso
Next row: K2tog, cut yarn and pull through to fasten off.

When you have 14 black diamonds, work the next band as follows:
Using dark green yarn and 3.75mm Afghan hook, pick up 13 sts along the top left edge of one black diamond, then 13 sts along the top right edge of another (see photo 1). 
Transfer the 26 sts to a 3.75mm knitting needle from the pointed end of the hook. (see Photo 2).
Photo 1 - picking up stitches

Photo 2 - transferring stitches
Foundation row: K2tog tbl, K tbl to last 2 sts, K2tog tbl.
Continue as for black diamond from ** above.

 
When you have joined all the black diamonds together you will have a band of 13 dark green diamonds.
Continue in this way, following the diagram, and working the single centre dark purple square on one section only.
Weave in the tails of yarn on the back of the work, stitching them into the seams made by picking up stitches. Leave the tails at the edges of the section until you have sewn the sections together.

Stitch the sections together carefully, following the diagram, and using the tails of yarn left from knitting to avoid too many knots.


Finished throw measures approximately 45 inches square.


Tuesday, 29 May 2012

Domino Knitting - Rainbow Cushion


I recently discovered this amazing way of producing square motifs – it’s variously known as modular knitting, domino knitting and mitred knitting.  The basic instructions came from here, but you will need to adjust the number of stitches depending on what size you want the squares to be, and also how many colours you want to use. 
In keeping with my obsession with rainbow colours, so needing 7 coloured stripes, I started with 42 stitches – this gives you 6 rows for each stripe.  I decided to start with something simple – a cushion cover – but you could just keep going and produce a large throw (known as an Afghan in the US). 
Each new square is attached to the existing ones by picking up stitches, rather than by sewing them all together afterwards – great if you hate sewing knitted pieces together.  The downside is all the ends that have to be sewn in; I found it easier to do this last, as you can then weave them into the seams so that they don’t show on the right side.
Note: I find the easiest way to pick up stitches is to use a crochet hook, preferably a long one.  Pick up all the stitches onto the hook, then transfer them to the knitting needle from the wrong end of the hook.  You may have to do the stitches in groups if the hook is not long enough – there must be a device out there that is a combination of knitting needle and crochet hook, but I haven’t found one yet!

Later note - February 2013 - I've found the mysterious device! Pack of 14 bamboo Afghan hooks in sizes from 3 mm to 10 mm from Amazon here

Rainbow Cushion

Materials 

Double knitting yarn in rainbow colours – mine were mainly Sirdar Hayfield Budget DK in red, orange, yellow, green, kingfisher, royal and purple - about 25 g of each colour.

Pair 3.75mm (UK 9, US 4) Knitting needles
3.75mm crochet hook (for picking up stitches – see note above)
16 inch square cushion pad

First square

With purple, cast on 44 sts.
Wrong side (WS): K2tog, K 40, K2tog (42 sts)
*Right side (RS): K19, K2tog, s1, k1, psso, K19 (40 sts)
WS: K 40
RS: K18, K2tog, s1, k1, psso, K18 (38 sts)
First square with 1 st left to start next square
WS: K38
Change to royal, and continuing to dec twice as above at the centre of each RS row, work 6 rows.
Change to kingfisher and work 6 rows as above.
Continue to change colour every 6 rows, using green, yellow, orange then red.
Continue until 4 sts remain.
RS: K2tog, s1, k1, psso
WS: K2tog.  Do not fasten off, as you will start the next square with red.

Squares 2 to 8

Ready to knit first row of square 2
With the last st from the first square still on your needle, pick up a further 21 sts along the upper edge of your square.  Cast on a further 22 sts. (44 sts in all)
WS: K2tog, K 40, K2tog (42 sts)
Continue from * in the first square, reversing the colour sequence, i.e. after red, work in orange, then yellow, green, kingfisher, royal and finally purple.
Ready to knit first row of square 9
Continue to add squares in this manner until you have 8 squares in a line.  Fasten off yarn after the 8th square.

Square 9

Using red, cast on 22 sts, then pick up 22 sts along right edge of square 1.
WS: K2tog, K40, K2tog (42 sts)
Continue from * in the first square, reversing the colour sequence, i.e. after red, work in orange, then yellow, green, kingfisher, royal and finally purple.

Squares 10 to 16

Joining a square on 2 sides
With the last st from the square 9 still on your needle, pick up another 21 sts along the upper edge of your square, then a further 22 sts along the right edge of square 2.
WS: K2tog, K 40, K2tog (42 sts)
Continue from * in the first square.
Continue to add squares in this manner until you have a second row of 8 squares.

Squares 17 to 32

Work another 2 rows of squares as for Squares 10 to 16, alternating the colour sequence as shown.
Numbering of squares
Sew in all ends securely, making sure the stitching does not show on the right side.  Leaving the left edge (the one with no ends to darn in) for the zip opening, fold the work in half and stitch seams.  Insert zip using fine backstitch in matching yarns.
Turn cushion cover right side out and insert cushion pad – you will need one approximately 16 inches square.

Monday, 30 January 2012

Toddler's rainbow striped hoodie pattern


 This is a pattern for the rainbow-striped hoodie I knitted for my granddaughter Elanor. The pattern is sized for a toddler aged 18 to 24 months, to fit a 22 inch chest. It's really easy to make, using DK yarn - you don't have to use the rainbow colours, it's a great way of using up those leftover yarns stashed in your cupboard.


Rainbow Striped Toddler Hoodie

 
Materials: Acrylic DK 100g balls – one each of red, orange, yellow, green , kingfisher , royal blue and purple.
One pair each UK10/3.25 mm and UK8/4 mm knitting needles.
14” open-ended zip in main colour.

Tension: 22 sts and 30 rows to 10 cm.

Measurements: To fit 22” chest (actual measurement 25”)


Back:
Using smaller needles and main colour (red), cast on 71 sts.  Work 15 rows in K1, P1 rib.
Change to larger needles, and working in st st, work 4 rows of each colour in order: purple, royal, kingfisher, green, yellow, orange, red (ie reverse rainbow).  Repeat until work measures 9.5 in (approx 56 rows).
Raglan shaping:  Continuing in pattern, cast off 2 sts at beg of next 2 rows.  Dec 1 st at both ends of next 5 rows, then dec 1 st at both ends of each K row until 21 sts remain.  Cast off.

Left front:
Using smaller needles and main colour, cast on 33 sts.  Work 15 rows in K1, P1 rib.
Change to larger needles, and work 56 rows in pattern as for Back.
Continuing in pattern, cast off 2 sts at beg of next row (armhole edge), P 1 row.
Dec 1 st at armhole edge of next 4 rows.
Dec 1 st at beg of K rows only until work measures 14”, finishing at neck edge.
Cast off 4 sts at beg of next row. Continuing to dec 1 st at armhole edge on K rows, also dec 1 st at neck edge on next 3 rows.
Continue to dec at armhole edge until 2 sts remain. K2 tog and finish off.

Right front:
Work to correspond with left front, but note that you need to work 1 row extra in the first st st stripe, so that the ends of the joined-in yarns will be in the side seam rather than the front edge. 

Sleeves (make 2):
Using smaller needles and main colour, cast on 39 sts and work 14 rows K1 P1 rib.
Inc row: Rib 4, (inc in next st, rib 5) 5 times, inc in next st, rib 4 (45 sts)
Change to larger needles and starting with 5th row of pattern (omitting first stripe) st st 4 rows.  Continuing in stripe pattern, inc 1 st at each end of next and following 6th row until you have 57 sts.  Continue straight until sleeve stripes match those on the back and fronts.
Raglan shaping: as for back until 7 sts remain.  Cast off.

Hood:
Using smaller needles and main colour, cast on 113 sts and work 7 rows in K1 P1 rib. 
Change to larger needles and starting with first colour as on the back, work 4 rows st st.
Continuing in stripe pattern, dec 1 st at each end of next row.  P 1 row.  Repeat these 2 rows twice more (107 sts).
Work straight for 22 rows.
Dec 1 st at both ends of each row until 3 sts remain.  K 3 tog and finish off.

Front bands:
Using smaller needles and main colour, pick up and knit 83 sts evenly along left front edge.  Work 2 rows k1 p1 rib.  Cast off loosely in rib (it may help to cast off using the larger needles).
Repeat for right front.

Making up:  Pin out and press pieces lightly under a dry cloth.
Sew raglan seams, then join hood seam and attach hood.  Sew side and sleeve seams, attach zip.  Make tassel in main colour and attach to point of hood,


Pattern and photos © Sixties Spirit 2011

Why "Sixties Spirit"?


“If you can remember the sixties, you weren’t there” – a much-quoted comment attributed to Robin Williams.  Well, not everyone who was a teenager in the 60s was too stoned to remember any of it!  This was the era of the Baby Boomers, the decade that started in black and white and burst into glorious Technicolor around 1964.  The Beatles, Mary Quant, Carnaby Street – and by 1967 Sergeant Pepper, Jimi Hendrix, hippies, drugs and psychedelia.  It all came to an abrupt and horrifying end in 1969 at Altamont, when Meredith Hunter was killed while the Rolling Stones played.

So why “Sixties Spirit”?  For me the sixties spirit wasn’t so much about dropping out, but more to do with young people starting to think for themselves, questioning the established values handed down by previous generations.  If this meant we played music, wore clothes and had beliefs that our parents didn’t like or understand, so much the better – remember, the teenager as a cultural phenomenon had only come into existence in the 1950s, and then realistically only in the USA.

One of the keys to the 60s was creativity, something that seems to be sadly lacking in today’s world – as a child I learned how to sew, knit, crochet, cook, draw, paint, make toys from recycled junk, grow things in the garden – I would have 5 or 6 projects on the go at any one time from the age of about 6 or so.  Nothing changes – I still have this tendency – but these days it’s seen as more of a positive thing and called “multi-tasking”!

I chose the name Sixties Spirit as a label when I started making sixties-style clothing for my husband and the other members of his band, Spirit of the Experience. They are primarily a Hendrix tribute band, covering late 60s songs by Jimi Hendrix, Cream and other great bands from that era. He wanted the band to wear authentic outfits, but it's impossible to buy men's velvet flares these days, so I became wardrobe mistress, as well as publicist, photographer and sound/light assistant!

So this will end up being a very diverse blog, with recipes, knitting patterns, comments on the state of the world – anything that comes to mind.  I’ve spent the last 14 years teaching 16 to 19-year-olds, most recently General Studies, Critical Thinking, Philosophy and Sociology.  Having been made redundant last June, I need to do something to keep the old brain in working order, so please forgive my ramblings!