Tuesday, 29 May 2012

Domino Knitting - Rainbow Cushion


I recently discovered this amazing way of producing square motifs – it’s variously known as modular knitting, domino knitting and mitred knitting.  The basic instructions came from here, but you will need to adjust the number of stitches depending on what size you want the squares to be, and also how many colours you want to use. 
In keeping with my obsession with rainbow colours, so needing 7 coloured stripes, I started with 42 stitches – this gives you 6 rows for each stripe.  I decided to start with something simple – a cushion cover – but you could just keep going and produce a large throw (known as an Afghan in the US). 
Each new square is attached to the existing ones by picking up stitches, rather than by sewing them all together afterwards – great if you hate sewing knitted pieces together.  The downside is all the ends that have to be sewn in; I found it easier to do this last, as you can then weave them into the seams so that they don’t show on the right side.
Note: I find the easiest way to pick up stitches is to use a crochet hook, preferably a long one.  Pick up all the stitches onto the hook, then transfer them to the knitting needle from the wrong end of the hook.  You may have to do the stitches in groups if the hook is not long enough – there must be a device out there that is a combination of knitting needle and crochet hook, but I haven’t found one yet!

Later note - February 2013 - I've found the mysterious device! Pack of 14 bamboo Afghan hooks in sizes from 3 mm to 10 mm from Amazon here

Rainbow Cushion

Materials 

Double knitting yarn in rainbow colours – mine were mainly Sirdar Hayfield Budget DK in red, orange, yellow, green, kingfisher, royal and purple - about 25 g of each colour.

Pair 3.75mm (UK 9, US 4) Knitting needles
3.75mm crochet hook (for picking up stitches – see note above)
16 inch square cushion pad

First square

With purple, cast on 44 sts.
Wrong side (WS): K2tog, K 40, K2tog (42 sts)
*Right side (RS): K19, K2tog, s1, k1, psso, K19 (40 sts)
WS: K 40
RS: K18, K2tog, s1, k1, psso, K18 (38 sts)
First square with 1 st left to start next square
WS: K38
Change to royal, and continuing to dec twice as above at the centre of each RS row, work 6 rows.
Change to kingfisher and work 6 rows as above.
Continue to change colour every 6 rows, using green, yellow, orange then red.
Continue until 4 sts remain.
RS: K2tog, s1, k1, psso
WS: K2tog.  Do not fasten off, as you will start the next square with red.

Squares 2 to 8

Ready to knit first row of square 2
With the last st from the first square still on your needle, pick up a further 21 sts along the upper edge of your square.  Cast on a further 22 sts. (44 sts in all)
WS: K2tog, K 40, K2tog (42 sts)
Continue from * in the first square, reversing the colour sequence, i.e. after red, work in orange, then yellow, green, kingfisher, royal and finally purple.
Ready to knit first row of square 9
Continue to add squares in this manner until you have 8 squares in a line.  Fasten off yarn after the 8th square.

Square 9

Using red, cast on 22 sts, then pick up 22 sts along right edge of square 1.
WS: K2tog, K40, K2tog (42 sts)
Continue from * in the first square, reversing the colour sequence, i.e. after red, work in orange, then yellow, green, kingfisher, royal and finally purple.

Squares 10 to 16

Joining a square on 2 sides
With the last st from the square 9 still on your needle, pick up another 21 sts along the upper edge of your square, then a further 22 sts along the right edge of square 2.
WS: K2tog, K 40, K2tog (42 sts)
Continue from * in the first square.
Continue to add squares in this manner until you have a second row of 8 squares.

Squares 17 to 32

Work another 2 rows of squares as for Squares 10 to 16, alternating the colour sequence as shown.
Numbering of squares
Sew in all ends securely, making sure the stitching does not show on the right side.  Leaving the left edge (the one with no ends to darn in) for the zip opening, fold the work in half and stitch seams.  Insert zip using fine backstitch in matching yarns.
Turn cushion cover right side out and insert cushion pad – you will need one approximately 16 inches square.

Monday, 30 January 2012

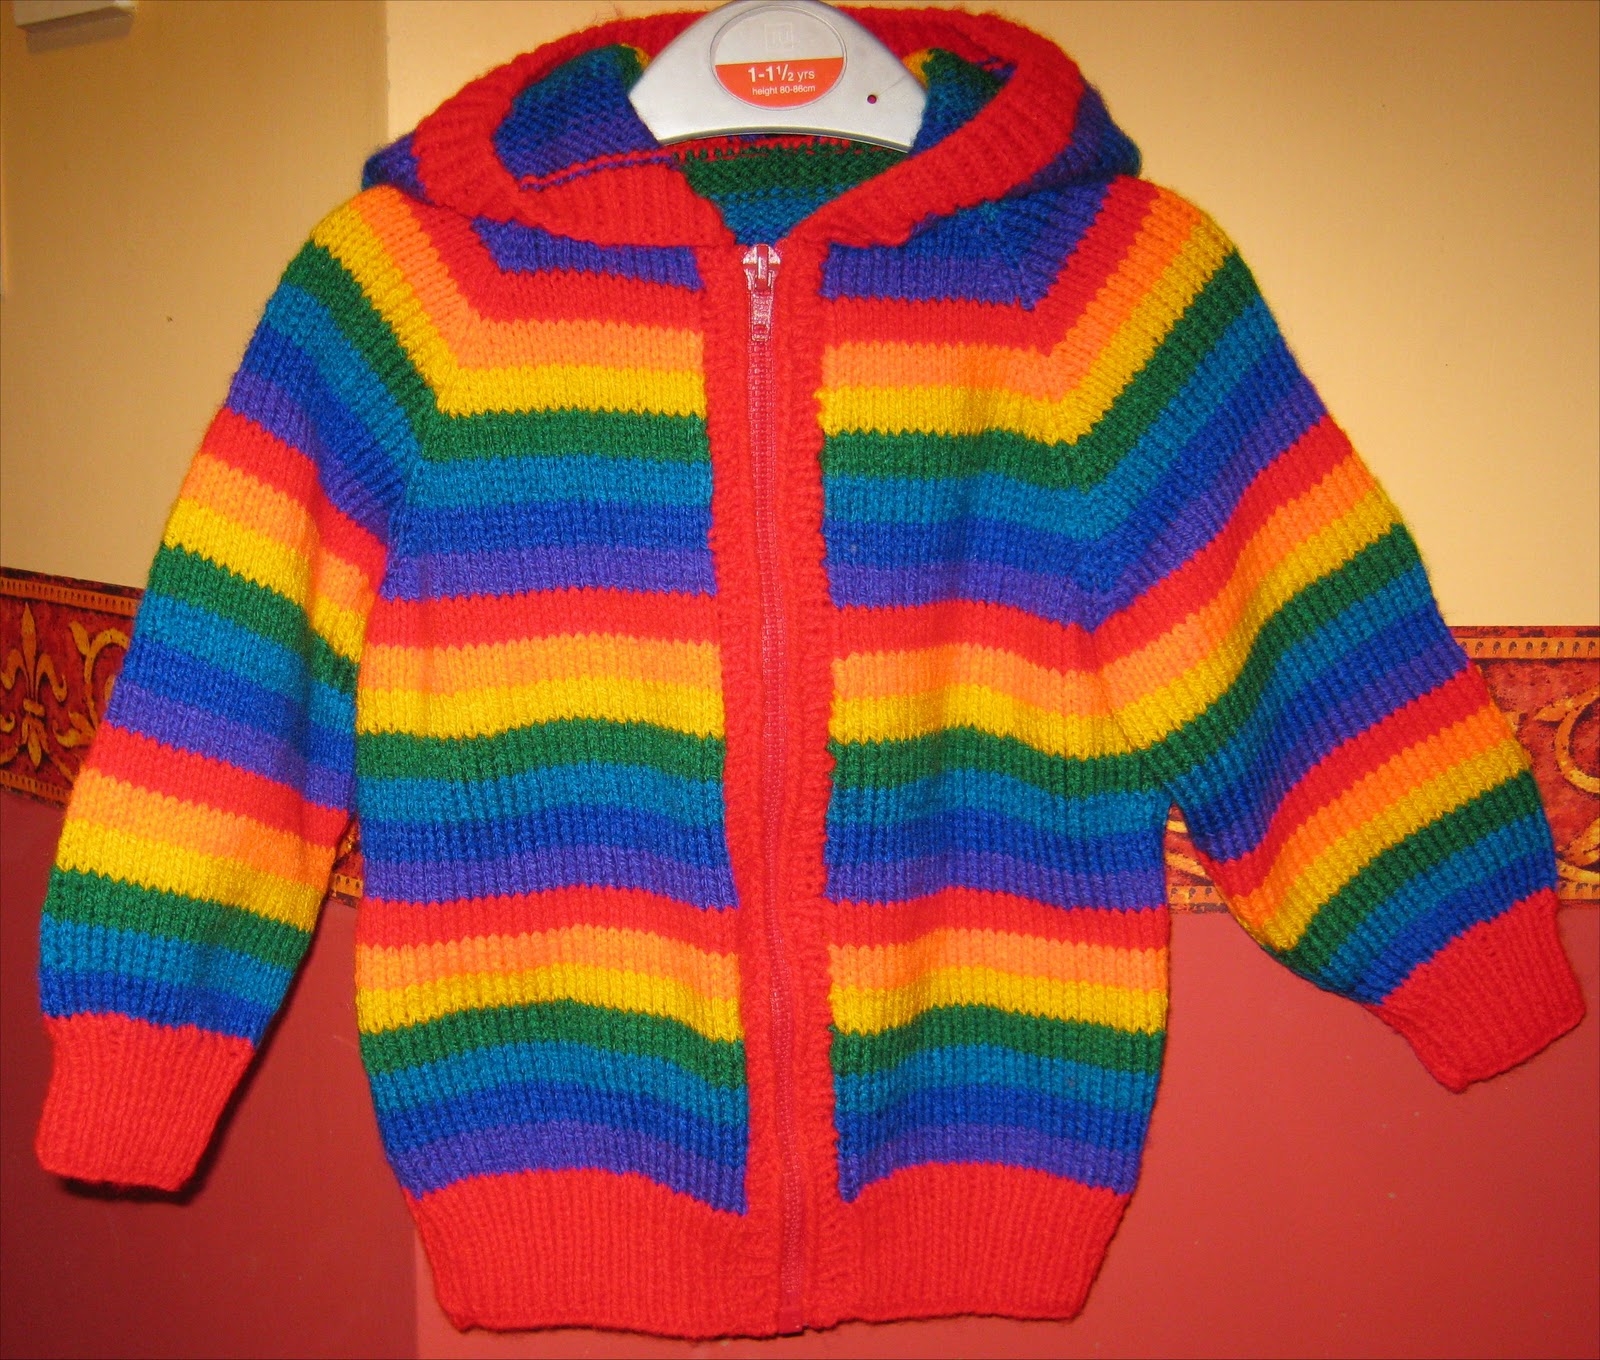
Toddler's rainbow striped hoodie pattern


 This is a pattern for the rainbow-striped hoodie I knitted for my granddaughter Elanor. The pattern is sized for a toddler aged 18 to 24 months, to fit a 22 inch chest. It's really easy to make, using DK yarn - you don't have to use the rainbow colours, it's a great way of using up those leftover yarns stashed in your cupboard.


Rainbow Striped Toddler Hoodie

 
Materials: Acrylic DK 100g balls – one each of red, orange, yellow, green , kingfisher , royal blue and purple.
One pair each UK10/3.25 mm and UK8/4 mm knitting needles.
14” open-ended zip in main colour.

Tension: 22 sts and 30 rows to 10 cm.

Measurements: To fit 22” chest (actual measurement 25”)


Back:
Using smaller needles and main colour (red), cast on 71 sts.  Work 15 rows in K1, P1 rib.
Change to larger needles, and working in st st, work 4 rows of each colour in order: purple, royal, kingfisher, green, yellow, orange, red (ie reverse rainbow).  Repeat until work measures 9.5 in (approx 56 rows).
Raglan shaping:  Continuing in pattern, cast off 2 sts at beg of next 2 rows.  Dec 1 st at both ends of next 5 rows, then dec 1 st at both ends of each K row until 21 sts remain.  Cast off.

Left front:
Using smaller needles and main colour, cast on 33 sts.  Work 15 rows in K1, P1 rib.
Change to larger needles, and work 56 rows in pattern as for Back.
Continuing in pattern, cast off 2 sts at beg of next row (armhole edge), P 1 row.
Dec 1 st at armhole edge of next 4 rows.
Dec 1 st at beg of K rows only until work measures 14”, finishing at neck edge.
Cast off 4 sts at beg of next row. Continuing to dec 1 st at armhole edge on K rows, also dec 1 st at neck edge on next 3 rows.
Continue to dec at armhole edge until 2 sts remain. K2 tog and finish off.

Right front:
Work to correspond with left front, but note that you need to work 1 row extra in the first st st stripe, so that the ends of the joined-in yarns will be in the side seam rather than the front edge. 

Sleeves (make 2):
Using smaller needles and main colour, cast on 39 sts and work 14 rows K1 P1 rib.
Inc row: Rib 4, (inc in next st, rib 5) 5 times, inc in next st, rib 4 (45 sts)
Change to larger needles and starting with 5th row of pattern (omitting first stripe) st st 4 rows.  Continuing in stripe pattern, inc 1 st at each end of next and following 6th row until you have 57 sts.  Continue straight until sleeve stripes match those on the back and fronts.
Raglan shaping: as for back until 7 sts remain.  Cast off.

Hood:
Using smaller needles and main colour, cast on 113 sts and work 7 rows in K1 P1 rib. 
Change to larger needles and starting with first colour as on the back, work 4 rows st st.
Continuing in stripe pattern, dec 1 st at each end of next row.  P 1 row.  Repeat these 2 rows twice more (107 sts).
Work straight for 22 rows.
Dec 1 st at both ends of each row until 3 sts remain.  K 3 tog and finish off.

Front bands:
Using smaller needles and main colour, pick up and knit 83 sts evenly along left front edge.  Work 2 rows k1 p1 rib.  Cast off loosely in rib (it may help to cast off using the larger needles).
Repeat for right front.

Making up:  Pin out and press pieces lightly under a dry cloth.
Sew raglan seams, then join hood seam and attach hood.  Sew side and sleeve seams, attach zip.  Make tassel in main colour and attach to point of hood,


Pattern and photos © Sixties Spirit 2011

Why "Sixties Spirit"?


“If you can remember the sixties, you weren’t there” – a much-quoted comment attributed to Robin Williams.  Well, not everyone who was a teenager in the 60s was too stoned to remember any of it!  This was the era of the Baby Boomers, the decade that started in black and white and burst into glorious Technicolor around 1964.  The Beatles, Mary Quant, Carnaby Street – and by 1967 Sergeant Pepper, Jimi Hendrix, hippies, drugs and psychedelia.  It all came to an abrupt and horrifying end in 1969 at Altamont, when Meredith Hunter was killed while the Rolling Stones played.

So why “Sixties Spirit”?  For me the sixties spirit wasn’t so much about dropping out, but more to do with young people starting to think for themselves, questioning the established values handed down by previous generations.  If this meant we played music, wore clothes and had beliefs that our parents didn’t like or understand, so much the better – remember, the teenager as a cultural phenomenon had only come into existence in the 1950s, and then realistically only in the USA.

One of the keys to the 60s was creativity, something that seems to be sadly lacking in today’s world – as a child I learned how to sew, knit, crochet, cook, draw, paint, make toys from recycled junk, grow things in the garden – I would have 5 or 6 projects on the go at any one time from the age of about 6 or so.  Nothing changes – I still have this tendency – but these days it’s seen as more of a positive thing and called “multi-tasking”!

I chose the name Sixties Spirit as a label when I started making sixties-style clothing for my husband and the other members of his band, Spirit of the Experience. They are primarily a Hendrix tribute band, covering late 60s songs by Jimi Hendrix, Cream and other great bands from that era. He wanted the band to wear authentic outfits, but it's impossible to buy men's velvet flares these days, so I became wardrobe mistress, as well as publicist, photographer and sound/light assistant!

So this will end up being a very diverse blog, with recipes, knitting patterns, comments on the state of the world – anything that comes to mind.  I’ve spent the last 14 years teaching 16 to 19-year-olds, most recently General Studies, Critical Thinking, Philosophy and Sociology.  Having been made redundant last June, I need to do something to keep the old brain in working order, so please forgive my ramblings!